Saturday, September 7, 2013

Images in HTML

By now you know enough to write a very nice, text-based home page, but it
is the ability of the Web to provide pictures, technically called images, graphics, pictures
or sometimes icons, that have made it so popular. By adding images to the web pages,

it will add better look and feel as well as complete information about the topic by text
and by visuals. In section, you’ll learn how to place an image on your page and also
how to turn an image into a link to another page.
There are two basic image file formats you will find on the Web. Each is
denoted to the browser by a different suffix. GIF is an acronym for Graphics
Interchange Format and JPEG or JPG (pronounced “j-peg”) are two names to denote
the other format. JPEG is an acronym for Joint Photographic Experts Group, the
organization that invented the format.
GIF format was invented by Compuserve and it’s very popular. The reason is
that it’s a simple format. It’s a series of coloured picture elements, or dots, known as
pixels, that line up to make a picture.
The JPEG format is unique in that it uses compression after it has been created.
For example, if the picture is 10K bytes when displayed, it may be only 4K bytes
when stored.
Let’s start this section with an image of the Sinharaja Rainforest, which has
been stored in your computer hard disk. The name of the image file is 'Sinharaja. jpg.'
Including images is very simple. You employ the <IMG> (for IMAGE) tag. The required
attribute of this tag is SRC, which takes the value of the image file’s URL For example:
<IMG SRC=”Sinharaja.jpg”>


Example 5.9
<HTML>
<HEAD>
<TITLE>Example 5.09</TITLE>
</HEAD>
<BODY>
<H1>Inserting Image</H1>
<P>Sinharaja Rainforest<BR>
<IMG SRC=”Sinharaja.jpg” ALT=”Sinharaja
Forest”>
<P>Sinharaja is the country’s last viable area of
primary tropical rainforest. More than 60% of the trees
are endemic and many of them are considered rare. There
is much endemic wildlife, especially birds, but the reserve
is also home to over 50% of Sri Lanka’s endemic species
of mammals and butterflies. As well as many kinds of
insects, reptiles and rare amphibians. </P>
</BODY>
</HTML>


The SRC attribute determines the source of the image file and takes a URL as
value. We have used a relative URL which shows that 'Sinharaja.jpg' is located in the
same directory as this file or another web site with its location. For example if the
'Sinharaja .jpg' image is located in the web address of www.ucsc.cmb.ac.lk, it can be
inserted as follows.
<IMG SRC=”http://www.ucsc.cmb.ac.lk / Sinharaja.jpg”>


Picture of Sinharaja in the Web Page

Alternative Images

The <ALT> (ALTernate image) attribute is now required. You can put some
advisory text with the use of this attribute. This text is displayed when the mouse
pointer is placed on the image. You should get into the good habit of including ALT
tags. Visitors using text-based browsers or who have turned off images in their browsers
will not be able to see the image. However, they would be able to read the image
description through the ALT attribute.
<IMG SRC=”Sinharaja.jpg” ALT = “Image of Sinharaja Rainforest”>

Aligning Text & Images

Image can be place at a specified position, in relation to the paragraph. In this
case few attributes can be used like in Figure 5.10, such as 'ALIGN' and 'WIDTH'.

Example
<HTML>
<HEAD>
<TITLE>Example 5.10</TITLE>
</HEAD>
<BODY>
<H1>Aligning Text & Images</H1>
<P> The text aligns with the top of the
image.</p>
<IMG ALT=”Galle Port” ALIGN=TOP WIDTH=360
SRC=”Galle Port.jpg”>
<H2><FONT SIZE=6><B> Galle Port <B>
</FONT></H2>
</BODY>
</HTML>

Alignment
The ALIGN attribute is used to align other HTML elements such as text around
the image. Thus, <IMG SRC="Galle Port .jpg" WIDTH="360" ALIGN="TOP"> will
align the image to the top and text to its bottom.
<IMG ALIGN=TOP SRC=”image.gif”>
ALIGN can also take “TOP”, “BOTTOM” or “MIDDLE” as value. These
align the text to the top, middle or bottom of the image.

TOP                The text aligns with the top of image
TEXTTOP       The image is aligned with the top of the
                        tallest text in the line.
MIDDLE         The text aligns with the middle of the
                        image
BOTTOM       The text aligns with the bottom of the
                        image
LEFT              The image aligns with the left margin,
                       and the text wraps around the right.
RIGHT           The image aligns with the right margin,
                       and the text wraps around the left.


Special Formats

Comments
As your HTML pages grow, so will their complexity. Maintaining such complex
pages can be quite a problem if there is no way to add documentation to these
files.
Fortunately, HTML provides tags through which you can add comments to
various sections of your scripts.The starting comment tag is <!— (that’s the ‘lesser
than’ sign followed by an exclamation mark and two dashes) and the ending tag
is —>.
<!-- This tag displays the text in the source
but not in the Internet Explorer display -->


Example
<HTML>
<HEAD>
<TITLE>Example 5.08</TITLE>
</HEAD>
<BODY>
<H1>Special Formats</H1>
<!— - Comments line - This text will not
display in the Netscape display - —>
<BLOCKOUT>This text block indented and
display as a separate paragraph.
</BLOCKOUT>
<PRE>
When display this text
will look exactly as it
does here ....
</PRE>
<ADDRESS>
I can be contacted at
html@html-book.lk
</ADDRESS>
</BODY>
</HTML>


Block quotes

If you wish to introduce some large body of text and make it stand out from
the rest, you should put it between <BLOCKQUOTE> - </BLOCKQUOTE>. The
enclosed text will be indented from the left and right margins and also adds space at
the top and bottom quite like this paragraph.
<BLOCKQUOTE>
This is tag display the text block indented and as a
separate paragraph.
</BLOCKQUOTE>


Pre-formatted Text

<PRE>—</PRE> The <PRE> tag retains the pre-formatted appearance of
                             the text in the HTML file, including any line breaks or
                             spaces. Text is usually displayed in a fixed width font.


Address
<ADDRESS>—</ADDRESS> The <ADDRESS> tag is used for information
                           such as addresses, authorship, and so forth. The
                           text is usually italicized and in some browsers it
                           is indented.


The <ADDRESS> - </ADDRESS> tag is a logical formatting element. You
should use this to include any address. This should NEVER be used for physical
layout as it may be rendered differently by the browsers.
<ADDRESS>
I can be contacted at
info@ucsc.cmb.ac.lk
</ADDRESS>


Ordered List

<OL>—</OL> The <OL>  tag encloses an ordered list of <LI> items.
                                           Typically ordered list are rendered as numbered list
START=                              value The values of the starting number in the ordered list
TYPE=Option                     Specifies how ordered items are to be marked.

(A|a|I|i|1)                             A= uppercase letters,
                                           a=lowercase letter,
                                           I=uppercase Roman numerals,
                                           i=lowercase Roman numerals,
                                          1=Digits, the default is 1.


The <OL> (Ordered List) helps keep an organized list with numbers or symbols
^Eg. 1" 2" 3 '''''' or i, ii, iii or a, b, c& where in the list items. If the ranking of items is
desired, we employ <OL> for ordered lists and </OL> as ending tag. To place
individual list items, you should use the <LI> (List Item).
Example"
<OL><L1> Item 1 </OL>
<OL><L1> Item 1
<L1> Item 2
</OL>
An ending tag for a list item </LI> is not required.
Numbers are the default bullets in ordered lists but you can change them using
the TYPE attribute of <OL> tag. This attribute takes one of the two values:
Example,
<OL TYPE = 1 START = 1>
can be used, Number list can also specify the numbering type and starting
number.


For example,
<OL TYPE = i START = 3>


Un-ordered List

<UL>—</UL> The <UL> tag enclose an an ordered list of <LI> items.
Typically ordered list are rendered as symbolic list.
TYPE=Option TYPE specifies how ordered items are to be marked.
(DISK|CIRCLE|SQUARE)


<UL> - </UL> are the starting and ending tags of Unordered lists. List items
are included using the <LI> tag.
Eg : <UL>
<L1> Item 1
<L1> Item 2
</UL>
Unordered lists also support the TYPE attribute that takes disc, circle or square
as its value.

For example,
<UL TYPE = DISC>


Definition List

<DD> The <DD> tag formats text to be used as relative
definitions in the <DL> list

These lists are great for making glossaries. As you know, a glossary consists of
a term and a definition. For HTML Definition lists, which are enclosed between <DL>
and </DL> (Definition List), you have to use <DT> (Definition Title) to indicate the
Term and <DD> (Definition Description) to denote the definition.
For example,
<DL>
<DT> Title 1
<DD> Description 1
<DT> Title 2
<DD> Description 2
</DL>


Font Colour attributes


The COLOR attribute takes either the hexadecimal colour value or just the
colour name. Some common colour names are Blue, Green, Red, Yellow, White,
Black, Cyan, Magenta, Pink etc.
<FONT COLOR ="#RRGGBB">


Colours for monitors are in expressed in RGB, Red (RR), Green (GG) and
Blue (BB). The combinations of these colours yield other colours. The RGB values
can be expressed in percentages, integer values 0-255 or hexadecimal values 00 - FF.
Since we are concerned about colours on web pages we shall concentrate on
hexadecimal representation. In this notation, we use numbers 0 to 9 and alphabet
A to F.
0 means no colour and F means full colour.
Each colour in hexadecimal notation takes six digits, where the first two represent
RED, the second two, GREEN and the last two BLUE colour


For example,
<FONT COLOR ="#8F8FBD"> (for light steel blue colour)
<FONT COLOR ="blue"> ^for blue colour&


Notes :
• In HTML with <FONT> tag you can use size and COLOUR tags
together.
<FONT COLOR ="White" SIZE = 5>
• When you use colours relative hexadecimal values can be obtained
from Table 5.1
• If the colour value is not available in Table 5.1 it can be obtained from
'Adobe Photoshop'


Colours, Values & Names

List in HTML

When we create HTML documents, we all understand the importance of lists
in the document. They are an indispensable tool for cataloguing and indexing various
objects and events.
Two kinds of lists are very common and used by us regularly. The Ordered
Lists help us keep an organized inventory wherein the list items are ranked while in
Unordered Lists, the classification is not important and the list items do not occur in
any assorted order.


Example

<HTML>
<HEAD>
<TITLE>Example 5.07</TITLE>
</HEAD>
<BODY>
<H1>Ordered and Unordered</H1>
<H2>Ordered List</H2>
<OL TYPE=1 START=1>
<LI> First Item
<LI> Second Item
<LI> Third Item
</OL>
<H2>Unordered List</H2>
<UL TYPE=CIRCLE>
<LI> First Item
<LI> Second Item
<LI> Third Item
<UL TYPE=SQUARE>
<LI> Nested Item 1
<LI> Nested Item 2
<LI> Nested Item 3
<UL TYPE=DISC>
<LI> Nested Item 1
<LI> Nested Item 2
<LI> Nested Item 3
</UL>
<LI>Back to Square Nested Item 4
</UL>
</UL>
</BODY>
</HTML>


List in Web Document

Friday, September 6, 2013

Character tags

<EM>                    Emphasis (Usually Italics)
<STRONG>         Stronger emphasis (Usually bold)
<B>                       Boldface where available (Browser may render
                              line in another manner if boldface is notpossible)
<I>                         Italic (may be rendered as started in some cases)
<U>                       Underline (Maybe rendered as started in some cases)
<BIG>                   Bigger text
<SMALL>            Smaller text
<SUB>                 Subscripted text
<SUP>                 Superscripted text
<BLINK>              Flashing text


Font Size and Color

<FONT>—</FONT> The <FONT>   tag used to control the appearance 
                                                             of the text it encloses.
SIZE =                                                 Value Size of the font in points, it can be 
                                                             absolute or relative.
                                                             Specifying SIZE=5 sets the font size to 

                                                             5 points Specifying SIZE=+5 set the 
                                                             font size 5 points larger tha default tag.
COLOR =                                            Colour The colour of the enclosed text.
FACE=                                                 List The font faces of the text. Multiple font face 

                                                              can be specified, separated by commas. 
                                                              The browser 
                                                               will try to render the text in the order specified 
                                                               by the list.

In HTML, various properties of text can be changed using the <FONT> tag. Font size and colour can be modified using the appropriate attribute of this tag.
         SIZE: Changes Size.
         COLOR: Changes the colour.


Font Size attribute

<FONT SIZE = n >

Font size can be changed in two different ways.
The size attribute takes a number from 1 to 7 as its value with 1 as the smallest
and 3 the default.


Value of n 1 and 2 for Small Size
Value of n 3 for Normal Size
Value of n 4 to 7 for Large Size.


Also, you can use relative values, +n and -n, for increasing or decreasing font
size relative to the current size. For increasing relative font size use values +1 to +6
and for decreasing use -1 to -6.

<FONT SIZE = +n > or <FONT SIZE = -n>

Relative changes in font size with <FONT SIZE = + 2> or <FONT SIZE = - 2>
increment or decrement the font size by 2 point scale relative to the size specified in the
nearest.


Example 

<HTML>
<HEAD>
<TITLE>Example 5.06</TITLE>
</HEAD>
<BODY>
<H1>Font size and colour</H1>
<FONT SIZE=4 COLOR=”#0000FF”>
<P>This font is in Blue</FONT>
<FONT SIZE=6>
<P>This font is in size 6</FONT>
<FONT SIZE=3 COLOR=”black”>
<P>This font is in size 3 and Black color</
FONT>
</BODY>
</HTML>
Changing size and colour of fonts


Monday, September 2, 2013

Character Style

<B>—</B>                        The <B> tag displays the enclosed text in the bold type.
<BIG>—</BIG>                The <BIG> tag increased the size of the enclosed text. The
                                           exact appearance of the text depends on the browser and the
                                           default font size.
<BLINK>—</BLINK>       The <BLINK> tag causes the enclosed text to blink on and off.
<CITE>—</CITE>            The <CITE> tag is used for citation and usually displayed in italics.
<CODE>—</CODE>      The <CODE> tag is used for text taken from code for a 

                                           computer program. It is usually displayed in a fixed width font.
<EM>—</EM>                 The <EM> is used to emphasize text. The enclosed text is
                                           usually displays in italics
<I>—</I>                            The <I> tag italicizes the enclosed text.
<KBD>—</KBD>             The <KBD> is used for text made for appear as if it is came
                                             from a typewriter or keyboard.Text is displayed with a fixed 

                                             width font.
<SAMP>—</SAMP>        The <SAMP> tag displays text in a fixed width font.
<SMALL>—</SMALL>    The <SMALL> tag decreases the size of the enclosed text.
                                             The exact appearance of the text depends on the browser and the 

                                             default font size.
<STYLE>—</STYLE>       Contains information that identifies the style sheet in use.
<SUB>—</SUB>               The <SUB> tag displays the enclosed text as a subscript.
<SUP>—</SUP>               The <SUP> tag displays the enclosed text as a superscript.
<TT>—</TT>                      The <TT> tag displays text in a fixed width, teletype style font.
<U>—</U>                          The <U> tag underlines the enclose text. The <U> tag should
                                              be avoided because it will confide users with hypertext, which
                                              is typically underlined.
<VAR>—</VAR>                The <VAR> tag is used for text that represents a variable and
                                              is usually displayed in italics.


Example
<HTML>
<HEAD>
<TITLE>Example 5.05</TITLE>
</HEAD>
<BODY>
<H1>Character Emphasis </H1>
<P>this is <EM>Emphasis (Usually Italic)
</EM> text
<P>this is <STRONG>Stronger emphasis
(Usually bold)</STRONG> text
<P>this is <TT>Teletext </TT> text
<P>this is <B>Bold</B> text
<P>this is <I>Italic</I> text
<P>this is <U>Underline</U> text
<P>this is <BIG>BIGGER</BIG> text
<P>this is <SMALL>SMALLER</SMALL> text
<P>this is <SUB>Subscripted</SUB> text
<P>this is <SUP>Superscripted</SUP> text
</BODY>
</HTML>


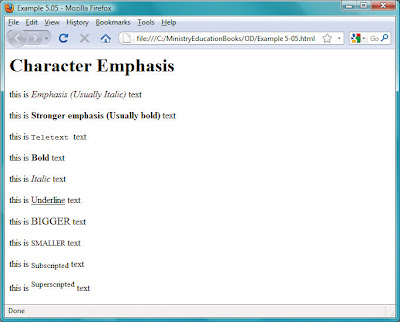
Text in HTML code can be dressed up or changed the styles in various ways so that it’s displayed differently by the browser. Using character tags, text can be made Bold, Underlined, Italicized, Struck-through etc. Moreover, you can make text both italicized and bold at the same time. Always remember to put the end tag
of the nested element before the end tag of the enclosing element. There are many tags that perform such embellishments on text. These tags can be either Physical Tags or Logical Tags.


Text styles in HTML

Horizontal Rules

Example
<HTML>
<HEAD>
<TITLE>Example 5.04</TITLE>
</HEAD>
<BODY>
<H1>Horizontal Rules</H1>
<HR COLOR=#FF0000>
<P><HR size= 4 width=80% COLOR=#CCFFCC>
<P><HR size=10 width=40>
<P><HR size=10 width=40 ALIGN=”LEFT”>
<P><HR size= 5 width=20% ALIGN=”RIGHT”>
<P><HR size= 4 width=80% NOSHADE>
<P><HR size=10 width=40 NOSHADE>
</BODY>


To separate block of text in a document you can use the simple but useful <HR> tag which puts a straight line across the page. There is no ending tag for the horizontal rule. The very inclusion of <HR> introduces the separating the line.

When you use Internet Explorer you can change the size, width, colour and alignment of the horizontal rule using various attributes.


Size
The SIZE attribute defines the thickness of the horizontal rule. It changes the thickness by specifying the number of pixels with the value.
eg : <HR SIZE = 5>


Width
WIDTH attribute defines the length or width of the rule. A value is required for this attribute. This value can be expressed in pixel numbers or percentage, which determines the length based on the width of the browser window.
eg :
<HR SIZE = 8 WIDTH = 50> (Length of the line in Pixels)
<HR SIZE = 8 WIDTH = 50%> (Length of the line in percentage)


Alignment
ALIGN attributes align horizontal rules using one of the three values for ALIGN attribute, “CENTER” (align to the centre), “LEFT” (align to the left), or “RIGHT”
(align to the right).
eg :
<HR SIZE = 8 WIDTH = 50 ALIGN = "CENTER">
<HR SIZE = 8 WIDTH = 50% ALIGN = "LEFT">
<HR SIZE = 8 WIDTH = 50 ALIGN = "RIGHT">
The line is aligned to the centre even without specifying ALIGN attibute. This is because ALIGN = "CENTRE" is a default attribute value for the <HR> tag.


No Shade
NOSHADE attribute is used to shade the line and they have this 3D kind of
effect. If you don’t want this, use the NOSHADE attribute. NOSHADE takes no
values.
eg :
<HR SIZE = 10 WIDTH = 40 NOSHADE>

Line Break

<BR> The <BR>                        tag forces a line break in the text.
CLEAR=option                          Causes the next line to start at the spot in which
(LEFT|RIGHT|ALL| NONE)               the specified margin is clear


<BR> tells your browser to go to the beginning of the next line. (BR stands for line BReak). <BR> acts in the same way as the ENTER key on your keyboard. When you press the ENTER key, the cursor goes to the beginning of the next line. With <BR>, the browser is also told to go to the beginning of the next line. The <BR> tag has no end </BR> tag because it doesn’t need to. Just the presence of <BR> adds
a line break.


1. When you display the file in a browser, you will find that the line breaks we had introduced (by hitting ‘Enter’ key) are ignored by the browser. The browser ‘wraps’ the text only at the end of the window space. This is because HTML has a special Line Break Tag, <BR> (BR for Line Break). You should use this tag to introduce any line breaks.

2. When you want to display your paragraph aligning to left, to right or to centre, the ALIGN attribute can be used with <P> tag. The ALIGN’ attribute takes one of the four values: LEFT, RIGHT, CENTER, or
JUSTIFY. Following shows some of the examples.
<P ALIGN = "RIGHT">
<P ALIGN = "CENTER">
<P ALIGN = "LEFT">

Paragraphs and Line Breaks

Paragraphs and Line Breaks

<P>—</P>                          The <P> tag defines the beginning and endin of a paragraph of text.
ALIGN=Option                    The alignment of the text in the paragraph
(LEFT| RIGHT| CENTER)


<H1> First Level Heading </H1>
<H2> Second Level Heading </H2>
<H3> Third Level Heading </H3>
<H4> Fourth Level Heading </H4>
<H5> Fifth Level Heading </H5>
<H6> Sixth Level Heading </H6>
When you use these tags, no other tags can be used inside these tags and if they are used, they will be ignored. Heading or sub heading can be aligned to the left, right or centre using 'ALIGN' attribute. If it is necessary <H1 ALIGN = CENTER> Title of the heading </H1> can be used to align the title at the centre of the web page. These values can be assigned to ALIGN and their 'LEFT', 'RIGHT' and 'CENTER'.
Paragraphs and Line Breaks
When you create web pages you can use <P> for paragraphs, sections and other phrases and to mark the end of such section you can use </P> ending tag. The Ending tag, in this case, is not compulsory; however there are some cases where the ending tag cannot be omitted. Such tags will be discussed later in this section. <P> for Paragraph, tells your browser to insert a blank or empty line and then begin a new line (a new paragraph). <BR> (for Line Break) tells the browser when a line has ended while <P> tells the browser to leave a blank line and begin a new paragraph.

 Example
<HTML>
<HEAD>
<TITLE>Example 5.03</TITLE>
</HEAD>
<BODY>
<H1>Paragraph and line Demo</H1>
<P>This is first Paragraph </P>
<H2>This is heading 2</H2>
<P>The paragraph two<BR>The paragraph three</P>
</BODY>
</HTML>


Thursday, August 29, 2013

HTML Tags 2

The Body


<BODY>—</BODY>         The <BODY> tag encloses all text, images, and other elements 
                                              that  will be visible to the user on the web page.


The <BODY> tags contain the content of the HTML page and to identify this section it is surrounded by <BODY> and </BODY>. The text between the <BODY> tags is displayed inside the browser window. In our case, we have the text “This is where the body of the document...” You will notice that this is displayed inside the browser window.

Heading


<H1>—</H1> <H2>—</H2>             The six levels of text headings ranging from the largest
<H3>—</H3><H4>—</H4>              (<H1>) to the smallest (<H6>). Text headings appear in
<H5>—</H5> <H6>—</H6>             bold face font.
ALIGN=Option                                    The alignment of the heading.
(LEFT|RIGHT|CENTER)


Headings help define the format and structure of the document. They provide valuable tool in highlighting important information, headings and sub headings and the nature of the document as a whole.
As you can see, the heading tags come in pairs with the opening and closing tags. Any text surrounded by these tags will be displayed differently depending on the heading number. There are six levels of headings in HTML specified by <H1>, <H2>, <H3>, <H4>, <H5> and <H6> tags. The use of these in an HTML document are as follows:


<H1> First Level Heading </H1>
<H2> Second Level Heading </H2>
<H3> Third Level Heading </H3>
<H4> Fourth Level Heading </H4>
<H5> Fifth Level Heading </H5>
<H6> Sixth Level Heading </H6>


When you use these tags, no other tags can be used inside these tags and if they are used, they will be ignored. Heading or sub heading can be aligned to the left, right or centre using 'ALIGN' attribute. If it is necessary <H1 ALIGN = CENTER> Title of the heading </H1> can be used to align the title at the centre of the web page. These values can be assigned to ALIGN and their 'LEFT', 'RIGHT' and 'CENTER'.


HTML Tags


Each tag consists of the name of the tag surrounded by the less-than '<' and greater-than ‘>’ signs. To tell the browser that something is a tag, you simply place “less than” and “greater than” symbols around them. The LESS THAN symbol is "<" and the GREATER THAN symbol is “>”. For example, P (for Paragraph) can be used as <P> in the web page. When you create web pages you can use <P> for paragraphs, sections and other phrases and to mark the end of such a section you can use </P> ending tag. The ending tag in this case is not compulsory; however there are some cases where ending the tag cannot be omitted. Such tags will be discussed later in this section.


Notes :
There is no need to use a couple of Tags for some instructional tags, and for security tags it is essential to use a couple of tags. For example, it is not essential to put </P> at the tag end of the paragraph.
HTML tags are not case sensitive. You can use CAPITAL Letters as well as simple letters. For example <TITLE>, <titLe>, <Title> and <title> have all the same result.


BODY, HEAD and TITLE for the HTML Document

Each HTML document begins with an <HTML> and ends with </HTML> tags and this implies that the document is made up of Hypertext Markup Language tags. HTML stands for Hypertext Markup Language which is the language of web page design. Example 5.2 shows how you can use tags such as <HTML>, <HEAD>, <TITLE>, <BODY>, <H1>, <H2>, <H3> and <H4> and Figure 5.4 shows the interface of the web page


Example 5.2
<HTML>
<HEAD>
<TITLE>Example 5.02</TITLE>
</HEAD>
<BODY>
<H1>This is where the body of the document...</H1>
<H2>This is Heading One</H2>
<H3>This is Heading Two</H3>
<H4>This is Heading Three</H4>
</BODY>

'Firefox' Web Window of Example 5.2

The Head
<HEAD>—</HEAD>       The <HEAD> tag encloses the code that provides
information                         about the document.


After Putting <HTML> to identify the main information use <HEAD> tag. To end this put </HEAD> and within these two tags use <TITLE> tag.

The Title


<TITLE>—</TITLE>              The <TITLE> tag is used to specify the text that appears
in the                                        Web browser’s title bar.


You will find an additional starting and ending pair of tags, the <TITLE> and </TITLE> inside the HEAD section, i.e. with <TITLE>University of Colombo </TITLE> between them and you are only allowed one TITLE element per page. So what is the purpose of this? Look at the display of the document and you will find that this text is shown on the top, at the Title bar of the browser. Thus, any text between the <TITLE> tags will be displayed here.


Use of HTML to design web sites


As a Markup Language, the purpose of HTML tags or codes are to provide a set of general rules that suggest how content should look when rendered

An HTML Document


Example 5.1 shows how HTML scripts are used for web pages and figure 5.3 shows first HTML script displayed on the internet browser, Firefox. It is displayed some of the important HTML tags for your attention.


Example 5.1

<HTML>
<TITLE>Example 5.01</TITLE>
<H1>What is HTML?</H1>
<P>The Hypertext Markup Language....</P>
<P>When HTML documents...</P>
</HTML>

This shows how example 5.01 is displayed in the web browser


In this example, <HTML>, <TITLE></TITLE>, <H1></H1>, <P></P> and </HTML> tags are used and Figure 5.3 shows how it is displayed in your computer monitor using Firefox browser.


<HTML>
Starts the HTML document.
<TITLE>
Text inside <TITLE> tag displays the title of your web on the browser Title Bar.
<H1>
This is used to display the main title of your web page.
<P>
Used to highlight the paragraph of your web page.


3. WYSIWIG Editors


These editors can be used by even users new to this and who do not have wide knowledge of HTML codes to develop simple / basic web sites without any effort. These kind of editors have to be purchase from the market and some examples for them are as follows.


• ColdFusion
• Dream Weaver
   Introduced by Adobe Inc. and
• Expression Web
• SharePoint Designer
• Visual Studio
• Visual Web Developer Express are some of editors introduced by Microsoft
   Company.

2 Object Editors


Can use pre designed models the object editors designed with user friendly HTML tags and attributed and specially, different colours are use to display tags and attributes.
Another special feature of these object editors is ability to manipulate codes of different computer languages. Rather can edit codes as need is another special feature this has. For an example, if you use HTML this provide facilities for that or if you use Java language to edit it provides interface with these facilities. Examples for those editors are follows.


1' EditPlus       -   Created for windows operating system by Sangil Kim for
                           Es - Computing Institute.
2' Homesite     -   Homesite developed by Adobe is use for windows operating system. Specially use 
                            for edit HTML codes.
3' Notepad++  - It has became a widely use editor which is created by Don Ho and can edit many 
                          computer languages by this, mostly use to edit HTML codes. This is free and can use 
                          with windows, Mac and Linux operating systems. More than 16 million people 
                           have downloaded Notepad++ from www.SoureForge.net web site. 

Interface of Notepad++


Use of Web Development Tools to Develop Web Sites


We have discussed that the web pages used in the WWW are develop according the rules of the Hypertext Markup Language (HTML). Web pages written in HTML are displayed on the screen by the web browsers. Multimedia files such as sounds, videos, images can be included in an HTML file. In order to establish links between items in other web pages and other web pages in web in the Internet,
‘Hyper-links’ can be established using HTML. ‘Hyper-Links’ can be used to link multimedia files too. In web site development three major types of tools can be used.


1. Text Editors
2. Object Editors
3. WYSIWIG - Editors


1. Text Editors
When developing web sites using a simple text editor you should have a good understanding about the HTML tags. A simple text editors such as ‘Notepad’ or ‘Notepad++’ can be used for this purpose and you need to type the HTML tags in appropriate way and you need good knowledge of HTML tags for this purpose. The basic knowledge needed for this activity will be provided in stages. 
We can discuss about some simple text editors which can be used for this
purpose. We can obtain them free of charge.


1. Notepad           -   Free too distributed with windows operating system By
                                    Microsoft Institute from their first windows operating system in 1985.
2. GEdit                -   Tool developed to use with Unicode. (See figure 5.1)
3. TextEdit            -    Free tool distributed with Macintosh Operating System.
4. TED Notepad   -   Text editors which developed from 2001 by Joraj Similovic can be 
                                    used with  windows operating system.

Interface of GEdit text editor


Organization of Information for Website Development 2


As mentioned before, a web browser has the capability of handing web pages with ‘Rich-text’ and other features such as paragraphs, fonts and images. In addition to this there are web sites in which live radio and live TV can be played. Web browsers have the ability to access such web sites and provide such facilities. Further, web browsers can be used for Live Chat, Internet Phone, Internet Meeting, News Groups
and Teleconferencing. The web browsers with appropriate ‘Plug-in’s can be used to execute applications developed using different application software. Web browsers with Plug-in s have advanced capabilities. For example, if you want to watch a video of a format such as 'Quick Time Movie' (a special multimedia
video format), you can add the 'plug-in' ‘Quick Time Movie Player’ to your browser and watch it. Most of these Plug-ins can be downloaded freely from the Internet. ‘Firefox’, ‘Internet Explorer’ and ‘Safari’ are widely used web browsers and they can be downloaded freely from the Internet. The following are the important features of web browsers.


Handling Media Using Plug-ins
‘Media Handler’ allows the browser to perform the operations using ‘Plug-ins avoiding any problems associated with the use of a ‘Plug-in.

Use of ‘Java Scripts’

Web browsers have the ability to browse web sites with programming language code such as ‘Java Script’. ‘Java Script’ is a programming language and codes written in this language can be included in your HTML
pages.

Value Added ‘HTML'

Using more advanced features of HTML, high quality web sites (close to pages of a magazine) can be created.


Electronic Mail (e-Mail)
Important applications like 'e-Mail' can be used.


Organization of Information for Website Development


In 1989, Tim Berners-Lee introduced to the world the World Wide Web (WWW) which is now distributed all over the world through the Internet. This system is today developed into a medium to communicate multimedia based information. The WWW has some agreed standards on the following.
1. How to organize the multimedia and other information.
2. How to store such organized information in the computer system.
3. How to link information in one computer to information in another computer
in the network.
4. How to retrieve such information.
5. How to use information.


A computer named ‘WWW Server’ in the network is used to store web pages organized using the above standards and the other computers in the network can obtain information in these web pages. One ‘WWW Server’ can be used to store websites of various organizations or individuals and every website has a ‘Home page’ and other web pages of the site are linked to the home page using ‘Hyperlinks’ or ‘Hyper-media’. The main feature of the ‘WWW Server’ system with web pages which are connected through ‘Hyperlink’ or ‘Hyper-media’ is that the information can be obtain in any order, any time by anybody (there are systems in which information
should be given in a particular order. The information provided through radio and televisions are examples of such information). Using ‘Hyper-media’ links an important item in a web page can be linked to a another web page in the same computer system or to a web page in another ‘WWW-Server’ in the Internet to get more detailed information about the item. It is possible to state four possible situations where such links can be established.

1. A link to another section in the same web page.
2. A link to a web page in the same web site.
3. A link to another web site in the Internet.
4. A link to another web page in another website in the Internet.


Another important feature of the ‘WWW’ is the ability to link different multimedia information. For example a link can be established to an image, video clip, sound clip or an animation picture.
If the files in the Internet are developed using only text, it is easy to obtain such files from the Internet. In order to prepare web based files, a special language called HTML (Hypertext Markup Language) can be used which has some special tags to indicate the type of information in the file using a specified set of rules. The HTML has some special instruction codes (tags) to incorporate image, sound, video and animation into a web file. A software tool call ‘Web Browser’ is needed to access the information in a web file. The Web browser interprets the instruction codes in a HTML file and provides the information in a web file in an appropriate way to the user on the monitor of the computer. The process takes place in four steps.


1. First a request is made to the computer which provides the information and
     checks whether information can be obtained .
2. If information can be obtained in this way the information will be provided to
    the client computer which requests information using ‘HTTP’ technology.
3. The information provided will be displayed on the client computer in an
    appropriate way according to the HTML tags in the file by the web browser.
4. If any image or multimedia content is to be displayed or played this will be
    executed using the tools in the client computer.


In addition to the standard tags in ‘HTML’, other software tools (‘Plug-ins’) with various capabilities developed by different companies can be incorporated in to an HTML file. This will give value addition to the retrieval of content in the Internet. HTML is a kind of word processor and a HTML file can be used in a computer with any operating system. The facilities of a word processor such as creation of fonts of varies sizes and shapes, title and sub title creation, tables, lists, paragraphs and different features in paragraphs can be done using HTML. In addition to this the multimedia files like images, sounds, animations and videos can be incorporated into an HTML file.
A web browser is needed to obtain the large information in the WWW which can be used in any computer. Some of these web browsers can be downloaded from the Internet without paying any fee. Some of the widely used web browsers are ‘Firefox’, ‘Internet Explorer’, ‘Safari’, ‘Opera’ and ‘Google Chrome’. These web browsers retrieve and provide information in a very user friendly way by point and click of a mouse. The basic capabilities of a web browser are given below.


¨ The ability to display an HTML file in plain text according to the
   HTML tags in the file.
¨ The ability to display web pages with images having an image file
   format GIF, JPG or PNG.
¨ The ability to play other multimedia files in an HTML file such as
   sound, video and animation.

¨ The ability to access web sites with ‘FTP’, Gopher’ and ‘Usenet’
   facilities.
¨ The ability to provide facility to input user information in a form and
   obtain such information.
¨ The ability to provide access to search engines so that the user can
   search information on web pages or web sites which he or she needs.